Guiding with Astroeq mount controller and a webcam
If your on a budget like me and want guided images so you can take longer exposures then hopefully this will be of use to you.
I have covered the use of ASTROEQ mount controller and what it is earlier on in my blog just search for astroeq and you can read all about it. But to start off with here is a list of the equipment I am using at present.
MOUNT AND TELESCOPE
My mount is the popular sky watcher EQ5 mount with the standard 200p Reflector Telescope it also comes with the 10x50 finder scope which as you will see later I have converted to use as my guide scope. Retailing at about 400.00 this is a great set up for astrophotography. I have used it for over 3 years now and can highly recommend it.

ASTROEQ MOUNT CONTROLLER AND GEARS FOR THE MOUNT.
Astroeq is made by Tom Carpenter and controls the gears on your mount it is the crucial part of my set up providing me with a fully working go to system and the ability to guide with my converted finder-scope and webcam fitted to it. You can find out more at Tom Carpenters website here is the link..

http://www.astroeq.co.uk/index.php
The gears on my mount are the standard sky watcher dual axis kit gears. It is possible if you are good at diy and electrics to fit your own gears but I already had the dual axis kit and Astroeq just plugs into these gears.
However I can not recommend the dual axis kit itself from Sky-watcher, the electrical circuit boards are of a very poor quality and burn out very easily. I don't say that lightly having had no less then 5 of there hand sets burn out on me and they do not offer single replacement parts. However the gears are fine so if you already have the dual axis kit your half way there.
WEBCAM AND FINDER SCOPE CONVERSION.
I use a webcam and my sky watcher finders scope to guide with and have fully covered this conversion process in my blog just search for webcam and you can read how to do it. It is not hard to do and does not involve complicated wiring or such but you will need to get a suitable webcam for the conversion. The sky watcher 10x50 finder scope makes a very good guide scope you will find it easy to use.
SOFTWARE USED FOR CONTROLLING THE MOUNT AND GUIDE SCOPE
Once you have got yourself an ASTROEQ mount controller you will be controlling your telescope with your laptop so I highly recommend sorting yourself out with a cheap shed observatory, also covered in my blog. It just makes life much easier to have a permanent set up but of course you can always use a table and chairs to have this lot set up outside as I did for a couple of years.
The software needed for this set up is as follows...
Config utility for Astroeq with latest update installed
Ascom drivers installed with EQMOD
Cartes Du Ciel star chart software
Backyard EOS for controlling your camera
Astro tortilla for pinpoint go to corrections.
PHD push here dummy guiding software
The good news is that all the above software is free apart from Backyard EOS which I use to control my Canon 350D camera. It is a very good bit of software though and worth the small price asked for it and I can highly recommend it.
Ok so that's the list of equipment used, there is a great deal to learn here not just the software and all its settings of course but also the process of guiding and how to get that working correctly. It takes time and patience to learn it all but hopefully this small guide and my blog will help you on your way.
This guide is assuming you are not a complete newbie to all this, if you are and need help I suggest you sign up to the Stargazers lounge forum and join in the discussions on Astroeq where myself and many others would be happy to help you out, so lets not for one minute think this guide will answer all your questions its just not going to happen.
However..
GUIDING WITH ASTROEQ AND PHD THE MAIN POINTS TO GET RIGHT..
One of the most frustrating things about guiding with PHD as you will find out for yourself when you start doing it is the watching the graph go all over the place and not knowing why it wont keep nice and steady when you start guiding. Even with your scope balanced well and everything seemingly ok that graph can start sliding off the scale and your stars are all wonky and you think to yourself stuff this I just cant be bothered with it any more. I know I have been there many times.
So what is the answer to getting a nice smooth graph and getting your guiding sorted out so you can achieve your aim of 5 or even 10 minute exposures with nice round stars.
I spent many nights trying to get this right and believe I have come up with the answer after much testing and re testing.
GET YOUR POLAR ALIGNMENT RIGHT!
You must make sure your polar alignment is absolutely accurate and a quick rough polar alignment will just not work. I tried many different ways of getting this right but by far the best method I have come across is to use your guide camera and phd. The method is not hard to do and once it is done you should get a lovely smooth graph and be able to guide accurately.
Here is the way I do it.
Polar Alignment
Drift alignment using PHD graphs
Requirements Auto-guidable telescope Guidescope Guide camera that is supported by PHD Guiding Computer PHD Guiding loaded onto computer
Normal telescope set-up
Level scope
Point south
Set RA adjustment to a centred position
Set altitude adjustment to the latitude of your position.
The principles of drift alignment remain the same
Find star on horizon and correct for altitude
Find star at celestial equator/meridian junction and correct for azimuth.
1.Altitude adjustment (ie up and down bolts)
Slew scope to star on horizon (in the east low down)
Start PHD and find star on your computer screen.Star does not need to be centred, does not need to be bright. Just a normal "guide star"
Click on star
Tell PHD to guide on star
PHD will now run through its calibration routine to determine which way is N/S/E/W and what the pixel scale for movement is.
Click on Disable guide output
Select "Tools" from main window
Select Enable Graph Back to main window
Select any star on screen Select guide button.
Switch window back to graph screen Watch direction of star drift with Red line only (DEC), do not worry about the blue line.
Stop guiding
Move altitude adjustment 1 degree in any direction and repeat previous procedure.Watch slope of red line drift, did it get sleeper shallower or swap direction up/down.
This will tell you which way and by how much your next move is.Keep re-iterating this procedure until you have a flat line.You should be able to re-iterate every 1 min if not less in the initial stages.
Remember, each horizontal dotted line in the graph window is 1 pixel of movement.
Azimuth adjustment ie side to side bolts
Slew to star on the celestial equator/meridian junction.
(In the south at 20° above horizon)
Repeat process for Altitude adjustment except for the initial calibration routine (PHD already knows which way is up)Remember, this time we are adjusting our azimuth controls, not our altitude controls.Again, we are still looking at our red DEC line only.Select and guide on star
Watch star drift above or below line.Stop guiding.Adjust azimuth to far maximum east or west
Select new guide star and watch for drift.Check drift slope did it increase, decrease or reverse direction.If slope decreased, then you are heading in the right direction but you are still not pointing far enough south. Adjust your azimuth controls on the mount to point further south and try again.It slope reversed, then you know that south is somewhere between where you are now and where you started. Again adjust azimuth in the reverse direction half of what you previously adjusted and try again.If slope increased then you know that south is on the other side of the half way mark.Adjust appropriately and re-iterate.
Our Goal
After one complete adjustment iteration of alignment for Altitude and Azimuth and you can get your star is tracking within 1-2 pixels (depending on your mounts PEC) for 1 minute, then you are good to go for guided exposures up to about 5-10 minutes before field rotation becomes noticeable
If you run through the process again and fine tune your alignment, you should see further improvements and unguided star tracking of 1-2 pixels for 3 minutes should mean you can run 15-20 minute guided exposures before field rotation becomes noticeable.
DOES THIS WORK?
There would be little point in doing all this if it didn't work right? So all I can tell you is that yes it does work but it also depends on the settings you have put in to EQMOD and PHD in other words there is a bit of tweaking to do and therefore I strongly advice you to test this all out on a moon lit night when you have plenty of time to practise and get all your setting correct.
So far I have been able to guide and get full 5 minute and ten minute exposures using this set up which is brilliant as I can now target those much fainter subjects. If you are new to all this don't think you are going to go out there and have it all up and running in a few minutes you need to fully understand your software and how that works and also understand the limitations of this set up. But if your on a budget and want to have fully working go to system and guiding this system works and it will not cost you an arm and a leg.
As usual you can find me on the stargazers lounge as Quatermass and I am happy to answer your questions and get you started, remember astrophotography is a very rewarding pastime and it does not have to cost you thousands of pounds to get decent images, it does require patience and perseverance.
This is a picture of my phd graph after using the above polar alignment method so long as your graph is like this you will be getting nice round stars and guiding will be spot on.

And here is a picture of my current set up showing how it all fits together.
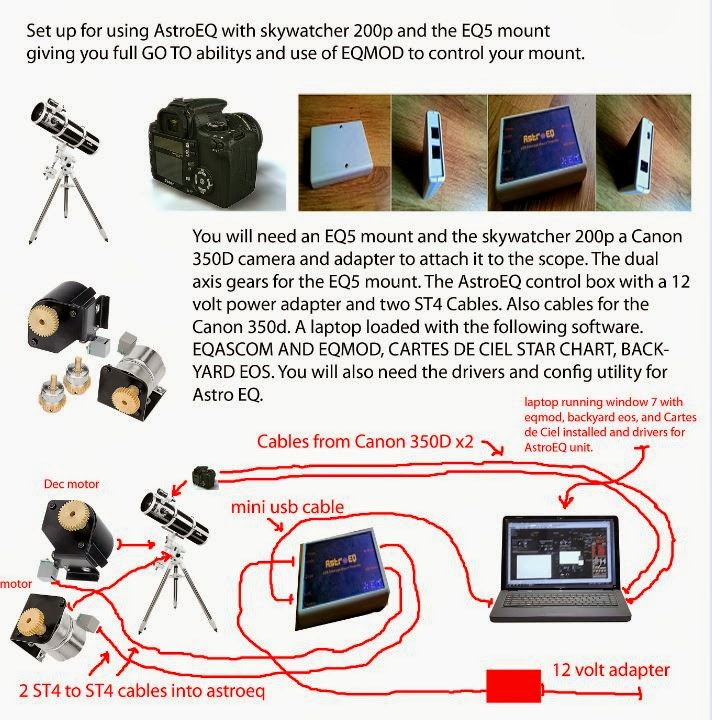
I have covered the use of ASTROEQ mount controller and what it is earlier on in my blog just search for astroeq and you can read all about it. But to start off with here is a list of the equipment I am using at present.
MOUNT AND TELESCOPE
My mount is the popular sky watcher EQ5 mount with the standard 200p Reflector Telescope it also comes with the 10x50 finder scope which as you will see later I have converted to use as my guide scope. Retailing at about 400.00 this is a great set up for astrophotography. I have used it for over 3 years now and can highly recommend it.
ASTROEQ MOUNT CONTROLLER AND GEARS FOR THE MOUNT.
Astroeq is made by Tom Carpenter and controls the gears on your mount it is the crucial part of my set up providing me with a fully working go to system and the ability to guide with my converted finder-scope and webcam fitted to it. You can find out more at Tom Carpenters website here is the link..
http://www.astroeq.co.uk/index.php
The gears on my mount are the standard sky watcher dual axis kit gears. It is possible if you are good at diy and electrics to fit your own gears but I already had the dual axis kit and Astroeq just plugs into these gears.
However I can not recommend the dual axis kit itself from Sky-watcher, the electrical circuit boards are of a very poor quality and burn out very easily. I don't say that lightly having had no less then 5 of there hand sets burn out on me and they do not offer single replacement parts. However the gears are fine so if you already have the dual axis kit your half way there.
WEBCAM AND FINDER SCOPE CONVERSION.
I use a webcam and my sky watcher finders scope to guide with and have fully covered this conversion process in my blog just search for webcam and you can read how to do it. It is not hard to do and does not involve complicated wiring or such but you will need to get a suitable webcam for the conversion. The sky watcher 10x50 finder scope makes a very good guide scope you will find it easy to use.
SOFTWARE USED FOR CONTROLLING THE MOUNT AND GUIDE SCOPE
Once you have got yourself an ASTROEQ mount controller you will be controlling your telescope with your laptop so I highly recommend sorting yourself out with a cheap shed observatory, also covered in my blog. It just makes life much easier to have a permanent set up but of course you can always use a table and chairs to have this lot set up outside as I did for a couple of years.
The software needed for this set up is as follows...
Config utility for Astroeq with latest update installed
Ascom drivers installed with EQMOD
Cartes Du Ciel star chart software
Backyard EOS for controlling your camera
Astro tortilla for pinpoint go to corrections.
PHD push here dummy guiding software
The good news is that all the above software is free apart from Backyard EOS which I use to control my Canon 350D camera. It is a very good bit of software though and worth the small price asked for it and I can highly recommend it.
Ok so that's the list of equipment used, there is a great deal to learn here not just the software and all its settings of course but also the process of guiding and how to get that working correctly. It takes time and patience to learn it all but hopefully this small guide and my blog will help you on your way.
This guide is assuming you are not a complete newbie to all this, if you are and need help I suggest you sign up to the Stargazers lounge forum and join in the discussions on Astroeq where myself and many others would be happy to help you out, so lets not for one minute think this guide will answer all your questions its just not going to happen.
However..
GUIDING WITH ASTROEQ AND PHD THE MAIN POINTS TO GET RIGHT..
One of the most frustrating things about guiding with PHD as you will find out for yourself when you start doing it is the watching the graph go all over the place and not knowing why it wont keep nice and steady when you start guiding. Even with your scope balanced well and everything seemingly ok that graph can start sliding off the scale and your stars are all wonky and you think to yourself stuff this I just cant be bothered with it any more. I know I have been there many times.
So what is the answer to getting a nice smooth graph and getting your guiding sorted out so you can achieve your aim of 5 or even 10 minute exposures with nice round stars.
I spent many nights trying to get this right and believe I have come up with the answer after much testing and re testing.
GET YOUR POLAR ALIGNMENT RIGHT!
You must make sure your polar alignment is absolutely accurate and a quick rough polar alignment will just not work. I tried many different ways of getting this right but by far the best method I have come across is to use your guide camera and phd. The method is not hard to do and once it is done you should get a lovely smooth graph and be able to guide accurately.
Here is the way I do it.
Polar Alignment
Drift alignment using PHD graphs
Requirements Auto-guidable telescope Guidescope Guide camera that is supported by PHD Guiding Computer PHD Guiding loaded onto computer
Normal telescope set-up
Level scope
Point south
Set RA adjustment to a centred position
Set altitude adjustment to the latitude of your position.
The principles of drift alignment remain the same
Find star on horizon and correct for altitude
Find star at celestial equator/meridian junction and correct for azimuth.
1.Altitude adjustment (ie up and down bolts)
Slew scope to star on horizon (in the east low down)
Start PHD and find star on your computer screen.Star does not need to be centred, does not need to be bright. Just a normal "guide star"
Click on star
Tell PHD to guide on star
PHD will now run through its calibration routine to determine which way is N/S/E/W and what the pixel scale for movement is.
Click on Disable guide output
Select "Tools" from main window
Select Enable Graph Back to main window
Select any star on screen Select guide button.
Switch window back to graph screen Watch direction of star drift with Red line only (DEC), do not worry about the blue line.
Stop guiding
Move altitude adjustment 1 degree in any direction and repeat previous procedure.Watch slope of red line drift, did it get sleeper shallower or swap direction up/down.
This will tell you which way and by how much your next move is.Keep re-iterating this procedure until you have a flat line.You should be able to re-iterate every 1 min if not less in the initial stages.
Remember, each horizontal dotted line in the graph window is 1 pixel of movement.
Azimuth adjustment ie side to side bolts
Slew to star on the celestial equator/meridian junction.
(In the south at 20° above horizon)
Repeat process for Altitude adjustment except for the initial calibration routine (PHD already knows which way is up)Remember, this time we are adjusting our azimuth controls, not our altitude controls.Again, we are still looking at our red DEC line only.Select and guide on star
Watch star drift above or below line.Stop guiding.Adjust azimuth to far maximum east or west
Select new guide star and watch for drift.Check drift slope did it increase, decrease or reverse direction.If slope decreased, then you are heading in the right direction but you are still not pointing far enough south. Adjust your azimuth controls on the mount to point further south and try again.It slope reversed, then you know that south is somewhere between where you are now and where you started. Again adjust azimuth in the reverse direction half of what you previously adjusted and try again.If slope increased then you know that south is on the other side of the half way mark.Adjust appropriately and re-iterate.
Our Goal
After one complete adjustment iteration of alignment for Altitude and Azimuth and you can get your star is tracking within 1-2 pixels (depending on your mounts PEC) for 1 minute, then you are good to go for guided exposures up to about 5-10 minutes before field rotation becomes noticeable
If you run through the process again and fine tune your alignment, you should see further improvements and unguided star tracking of 1-2 pixels for 3 minutes should mean you can run 15-20 minute guided exposures before field rotation becomes noticeable.
DOES THIS WORK?
There would be little point in doing all this if it didn't work right? So all I can tell you is that yes it does work but it also depends on the settings you have put in to EQMOD and PHD in other words there is a bit of tweaking to do and therefore I strongly advice you to test this all out on a moon lit night when you have plenty of time to practise and get all your setting correct.
So far I have been able to guide and get full 5 minute and ten minute exposures using this set up which is brilliant as I can now target those much fainter subjects. If you are new to all this don't think you are going to go out there and have it all up and running in a few minutes you need to fully understand your software and how that works and also understand the limitations of this set up. But if your on a budget and want to have fully working go to system and guiding this system works and it will not cost you an arm and a leg.
As usual you can find me on the stargazers lounge as Quatermass and I am happy to answer your questions and get you started, remember astrophotography is a very rewarding pastime and it does not have to cost you thousands of pounds to get decent images, it does require patience and perseverance.
This is a picture of my phd graph after using the above polar alignment method so long as your graph is like this you will be getting nice round stars and guiding will be spot on.
And here is a picture of my current set up showing how it all fits together.


Comments
Post a Comment