Lets do Astrophotography NOW! Part 1

You want to do Astrophotography but are completely confused on how to start yes? Dont worry that was me a year ago and now I feel well on my way so let me help you out it really is not hard, no it really isn't!

To start off really cheap and easy if you have a mobile phone with decent camera simply hold it on the eye piece and take some shots of the moon when its half full or strap it on with a rubber band and take a video download registax free stacking software and stack your video for some cool results check out my u tube channel at boodlewoodle and see some of the shots of the moon I got doing this.
That will get you started but then when the bug bites you will need to get a decent SLR camera a second hand Canon 350d is a very good choice cheap on ebay and great for astrophotography.
First things first the Equipment..
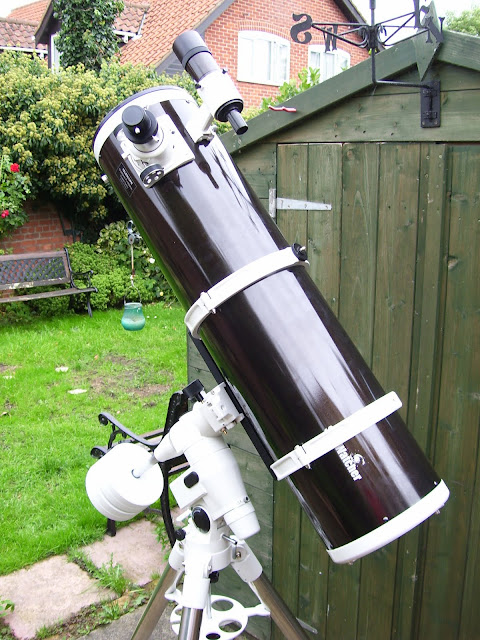
My telescope is a Sky Watcher 200p with a single axis motor drive here is a picture of it.

Notice the single axis motor drive below and control pad was fitted later this picture is when I first got the telescope and put it up in my back garden before I moved house.
This telescope is brilliant I love it to bits and would not hesitate to recommend it to any one looking to get started even if your not interested in astrophotography this is a great scope.
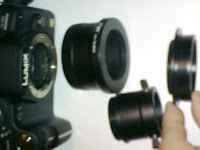
Ok so along with my telescope and its single axis motor drive I have got a Lumix G1 Camera and an adapter for it so it will fit on my telescope and later I got a canon 350d much better for astrophotography.
I got the adapter on ebay for about 15.00 the picture here shows the camera the adapter and the other two sections are from the telescope they screw into the adapter you only need to by the adapter if you have this camera if you have cannon or Nikon you will need to buy a different adapter to suit your camera. Dont be confused there's the T Ring that fits on the camera hole and the T Adapter that screws into that if you have a Sky watcher 200p like mine you only need to buy the T Ring that fits in the camera hole as the sky watcher already has a t adapter.
As well as the camera you will need to make your self a Bahtinov Mask not difficult to make at all, look on the net for a template and make one. I made mine from an old file holder. You will use this to focus the camera on a bright star. It sits over the end of
your scope and turns the star your focusing on into a split image in 3 sections, you then line up the middle section to get it in focus, very easy and a real time saver. It will cost you next to nothing to make one other then a half an hour with a sharp craft knife and some plastic sheet and tape, easy peezy.
At the moment that is all I use to take the shots but when I'm done to process the data I use Deep Sky stacker, free software get it on the net its easy to use, and I also use Photoshop cs4 plenty of good tutorials for that online and on the stargazers forum as well, if you cant get that use freebies on the net like Pixin sight often found on cds on Sky at night mag etc..
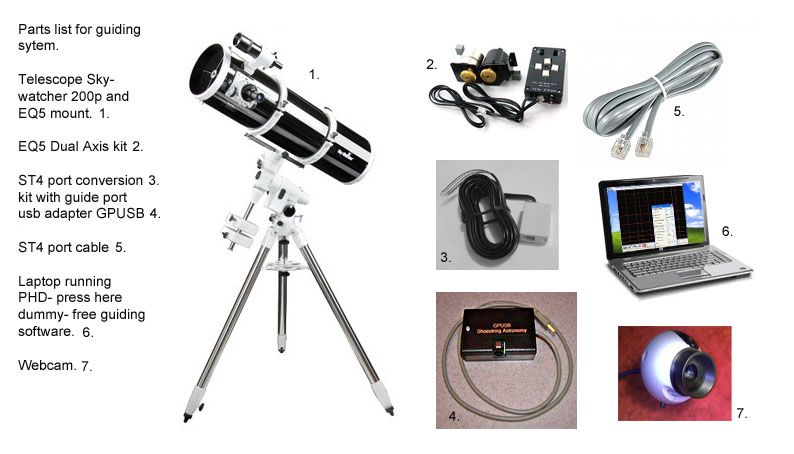
So Thats the Equipment I am using Ideally I would like a go to system with an ST4 Port and a star guider but I dont have that sorted yet, so we make do with what we have and the results are pretty good I feel for the time being.
So with the gear ready and a nice dark sky let go out there and get set up..
Imagine your there with me looking on, first of all I set the telescope up and plonk it down roughly lining the big letter N for north on the top of the leg to the North Star or use a compass and line it up that way if you like. Next I stoop down and look through my polar scope. In the polar scope there is a little circle that you need to get the north star sitting in by adjusting the position of the telescope so I set about doing that, holding a small red bicycle lamp above the hole at the end of the polar scope so I can see the north star better and get it lined up in that little circle.
Once its in that little circle and everything is looking even I move on to the next step finding a bright star and focusing my camera which I have attached to the telescope. Note I dont bother with to faff about to much here just a rough polar alignment will do me for now. Ok so I move the scope and using my finder scope on the top of the telescope locate a bright star like Vega say but any bright star will do. I use the live view on my camera and set it to
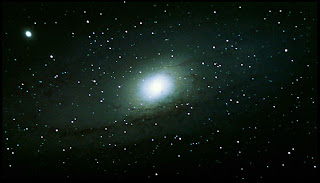
manual mode and the timer to self timer 10 second delay. Focus the telescope until the star is nice and in focus on the live view first. Then I put the Bahtinov Mask over the telescope and refocus with this on you will want to line up the middle line that the mask will create between the stars two other lines its easy to to dont panic. That done we now have focus sorted out so move the telescope over to your target in this case M31 the Andromeda Galaxy.
Ok so far so good but you will need to take a few quick and dirty shots to see if the target is in your live viewscreen right in the middle is good so it might take a few finder shots to get it right and then adjust little by little till you have it in the right place.
For this I set the camera setting to and ISO of 800 and a speed of 25-30 seconds and hit the button. But make sure your motor drive is on with a good power supply or new batterys so that it will keep it tracked and avoid star trails. Note if you dont have a DSLR camera you could try a cheap webcam as an alternative but it wont be as good as a DSLR or a dedicated and pricey ccd camera.
Were now ready to go so I start taking as many pictures using the RAW format not JPEG please! of my target as I can, say for M31 I took 85 shots and slapped the cover on and took 45 more shots this was for my darks as they are called with get subtracted out later on in deep sky stacker. Note I have not taken any lights as they are called just darks. You should take light and darks but I cant be bothered to do that just now ok lol. Also I dont have shutter release cable I just use the ten second delay timer on the camera.
So after freezing your butt out in the cold and taking over a hundred shots you should have a good amount of data to work with and try out some photo processing for later.
What you must do is take a few test shots first and check that the stars are not trailing or are out of focus if they are try realigning your telescope. Its rough its dirty it could be more fussy but what the hell it works for me and I'm guessing if your itching to have go it will work for you to and get you started. Have fun that's what this is all about chill out if its not perfect who cares you can get better as you go along ok.
So now we have our data the next part is loading it all in deep sky stacker that's not difficult at all so down load it and find out how to use it. Next when you have your image cooked in deep sky stacker take your image into Photoshop and have lots of fun learning how to use levels and curves first of all then move on to layers and blend modes.
Then you can sit back and gaze in awe at the amazing picture you have produced and give yourself a pat on the back your on your way to becoming a night dwelling obsessive astro photographer!
If you dont have much money and much gear dont forget I started of strapping my mobile phone to my telescope lens.
So what can you do with that little lot if you have it set up well this was my last shot of M31 it was

done just as I have described so dont be afraid to just give it a go we all have to start off somewhere remember and Im
happy enough for now. You can find me on the stargazers forum under Quatermass if you want to pm me I would be happy to answer your questions.
Clear skies..

Comments
Post a Comment